The first iteration, Murgen
Summary
This first dev-kit was Murgen, a Beaglebone kit, which gave the first image:
- See how it was wired
- Have a look at the images this iteration obtained
- See the contributions, progress and results of Zach, murgen's first user
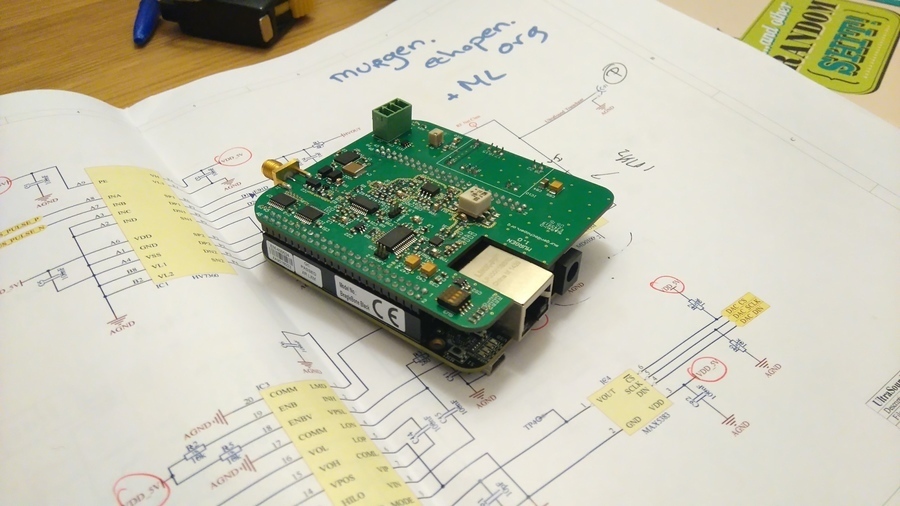
The Murgen open-source ultrasound imaging dev-kit
What is this ?
Getting a home-made open-source ultrasound machine (dev-kit) up and running in your garage / hackerspace / fablab for less than 500$ (want the bolts and nuts of the murgen-based prototype ? Read a more complete hardware Readme.md and in general the murgen repo ).
For a full overview of the adventure, visit our Hackaday page =)
For the full documentation of the overaching project, please visit our full doc
Getting the rough rough first image
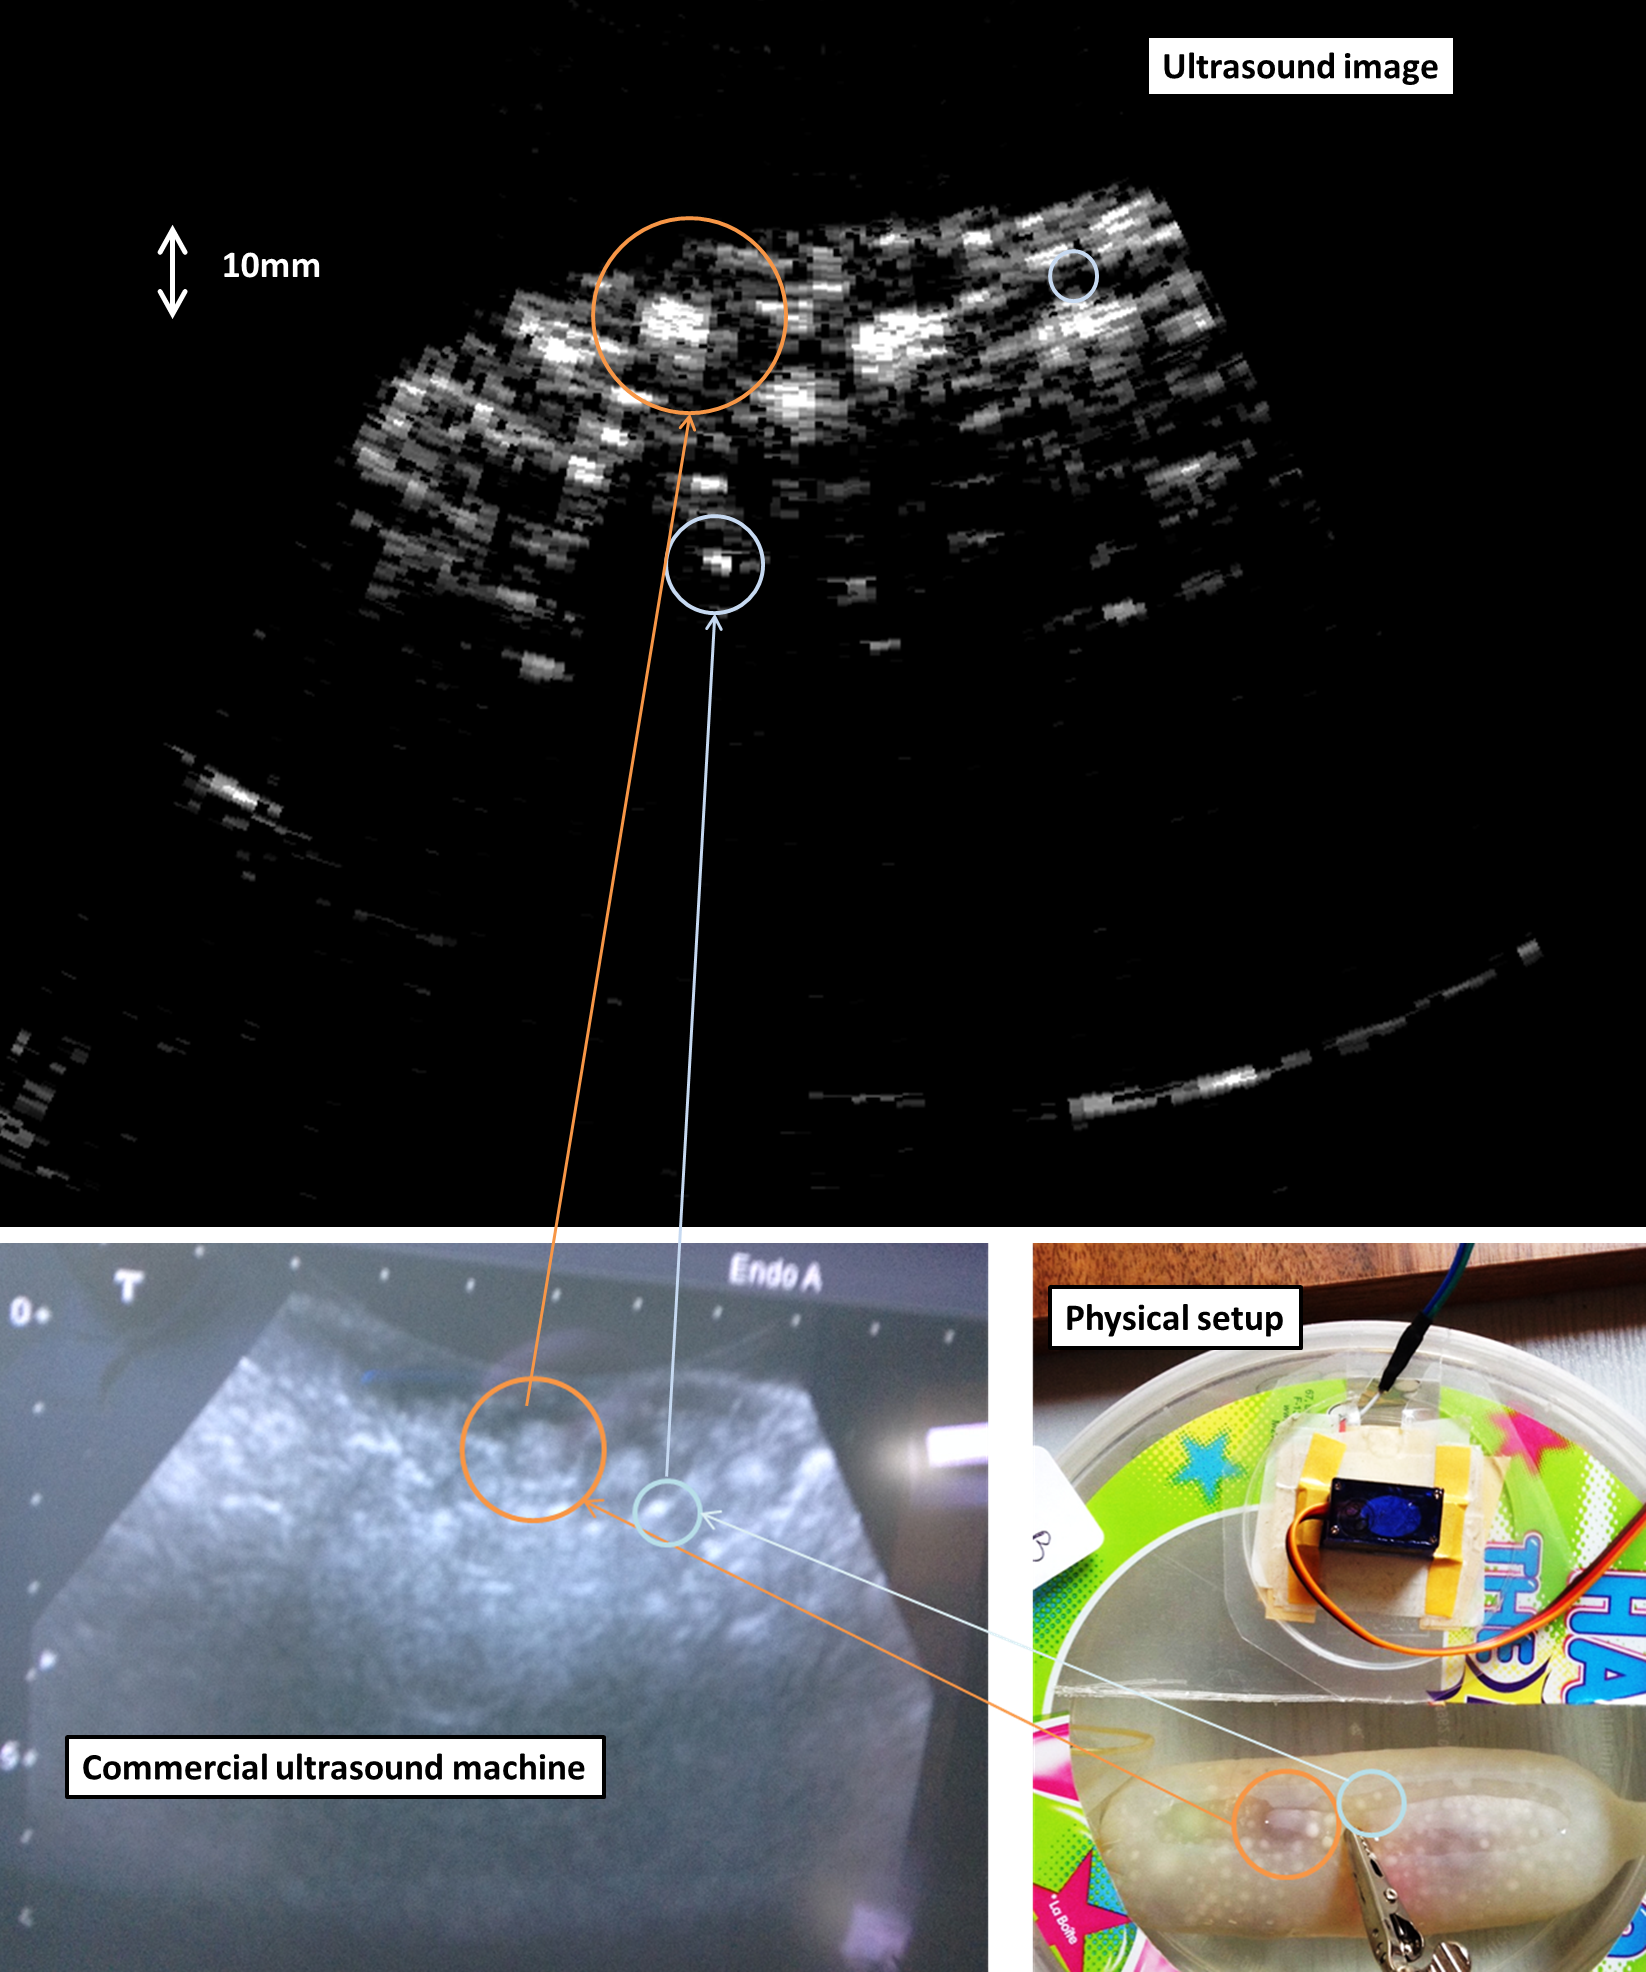
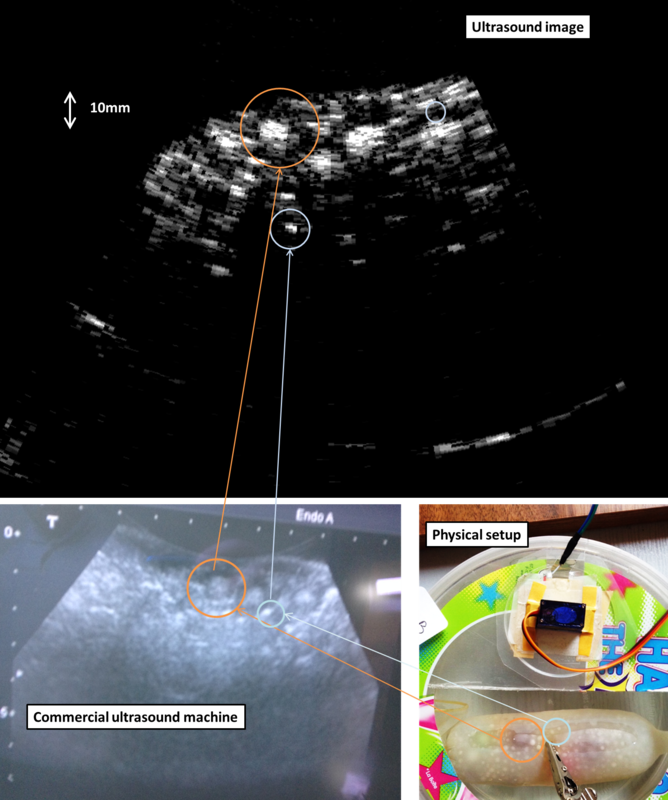
We've got our first ultrasound image with the murgen board =) Not a baby, mind you, but at least an echo coming from a part of a fantom (condom filled with agar gel and tapioca balls) in front of the transducer. And we haven't tapped into the full capabilities of the board yet, so it can be improved! Enclosed, the picture of the same fantom, using a commercial, 100k$ ultrasound machine.
Setting up a prototype
Disclaimers
Disclaimer #1: though an engineer, this project is the first of its sort, we never did something related. Bear with us, and the discovery process – we’re happy to learn on the way =)
Disclaimer #2: ultrasound raises questions. In case you build a scanner, use caution and good sense! Disclaimer #3: this project is not part of echopen.
How-to start
Time to get some shopping done !
- Get a murgen dev-kit: 140€ in electronics + PCB. Or 100€ with the components to put on a breadboard =)
- Get a BitScope: 150€
- Get a transducer : 110€ for brand new adaptaed ones, ~100€ for one found on ebay and hacking it
- Get a Trinket Pro / Arduino : 10€
- Get some small electronics (breadboard, cables et al) : 20€
- Misc (Pizza, Beer, and a donation to Murgen): 15€
Total spent: 400€ to 450€
Setup
Connections
- Connect the BitScope Chan A to Trinket Pin 11, and Chan B to Tests Points2 and 3.
- Connect the trinket pins 12 and 13 to a 5-to-3V convertor (or double invertor), then to the board USPP and USPN pins.
- Bring power to the board (GND, 5V, 3.3V) - the board uses ~150mA at 5V, so you can use a breadboard alim (see IMG_2413 below).
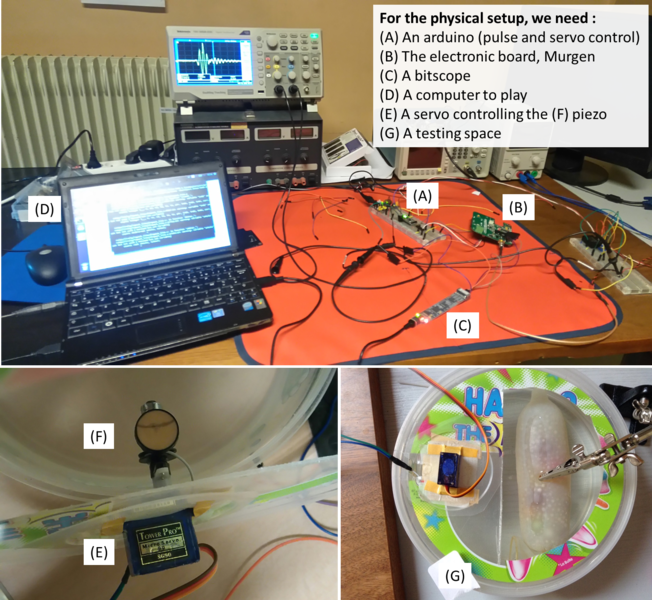
Hardware setup presentation
Software User’s Quick-Start Guide
Just Install the following:
- BitScope BitLib
- python math tools
- Install something to code arduino - ArduinoIDE ?
- Clone the murgen repo
You're good to go !
Learn more : the lab log
- Session 1 : Powering the board, power use, first (bad) trigging and echoes (06 March 2016)
- Session 2 : Non-controlled pulsing, inverters, better echoes (11 March 2016)
- Session 3 : Getting controlled pulsing, but width not controlled (15 March 2016)
- Session 4 : Width of the pulses is getting controlled =) (19 March 2016)
- Session 4b : Simple data visualisation with BitScope (19 March 2016)
- Session 5 : moving the transducer to get the first image (20 March 2016)
- Session 6 : Getting a clinically usable image (28 March 2016)
- Session 7 : Getting cleaner images - code improvements (3 April 2016)
- Session 8 : Comparing acquisition speeds (3 May 2016)
- Session 9 : Playing with ATL10PV (3 July 2016)
- A more complete hardware ReadMe : Information, and more, with a focus on the electronic part of the project
- A more complete software ReadMe : Information, and more, with a focus on the code part of the project (arduino, python, and such)
FAQ
I want to get to run one
Where should I go? You can peruse a discussion/tutorial with a new user of the board here.
What do I find here?
A full official dev release, including:
- Terms of reference for the project
- Bibliography
- Detailed designed
- Source file for the electronic board
- Source for the Arduino controlling the board
- Source for acquisition, processing and storage of the images
- A full laboratory log
Typical Application
Playing with a broken transducer in a haribo sweet box to see if you can hack ultrasound scanners.
Software / Firmware Summary
Up to v1.0, we're still playing with the board, so there's not interface with the BBB.
However, there's a series of tools to play with the board, one of which being the bitscope, a bit more handy than the redpitaya, and though it is less precise, we do have less issues (trigging, memory, ...) with it.
What is the timeline?
The murgen investigation had started in September 2015, and by the end of November, it had been activated again.
Find your way in the folders
 murgen-dev-kit/                main repo
 |-- hardware                hardware information on electronics and mecanics
 |-- software                code to acquire, process and store ultrasound data
 `-- worklogs                logs froms the lab: our path to a working ultrasound device
- You will find the CHANGES.TXT, CONTRIB.TXT and LICENSE.TXT at the root.
- Schematics are in the hardware\Altium\Schematics\PDF folder
- Gerbers in in the hardware\Gerbers folder of course
- Code for the acquisition using bitscope (at first ;) ) is in software/.
Remaining TODOs
The project's phase is coming to an end! Some ideas, lessons, stuff at our NextSteps.md
- Playin with the PRUs, there's some inspiration there
- There are 5 big projects listed on the NextSteps.md document.
Team
Acknowledgement
- Thanks to Murgen, Sofian, Amit, Emmanuel, Florent, Bertrand & PHH, Mike in a way, list goes on !
- Thanks to Jerome, Farad, Vincent obviously
- Thanks to echOpen for the environment, wifi and coffee =)
License
The Murgen project and its prototypes are open hardware, and working with open-hardware components.
Licensed under TAPR Open Hardware License (www.tapr.org/OHL)
Copyright Kelu124 (kelu124@gmail.com ) 2015-2018